7 minutes
Hugo website using GitHub Workflows and Cloudflare Pages
When setting up this website, I was thinking of a scalable hosting solution that is easy to deploy and requires as low maintenance as possible (as every dev knows, maintenance isn’t our favorite kind of work).
So I decided to go with a rather simple solution by using Hugo as SSG (Static Site Generator) hosted on Github, whereby on each Push the generated website will be deployed on Cloudflare Pages. The latter one has very generous usage limits so that every “normal” user should be fine with the free plan. Furthermore they offer quite a lot of nice security & privacy features by default.
Disclaimer: I won’t go into much detail on setting up your Cloudflare zones, domains etc. So please assure that your zone is setup.
Cloudflare Setup
Setting up a new Page on Cloudflare
Go to Workers & Pages -> Create -> Pages. Click “Upload assets”, enter the name of your website and upload any file to finalize the creation.
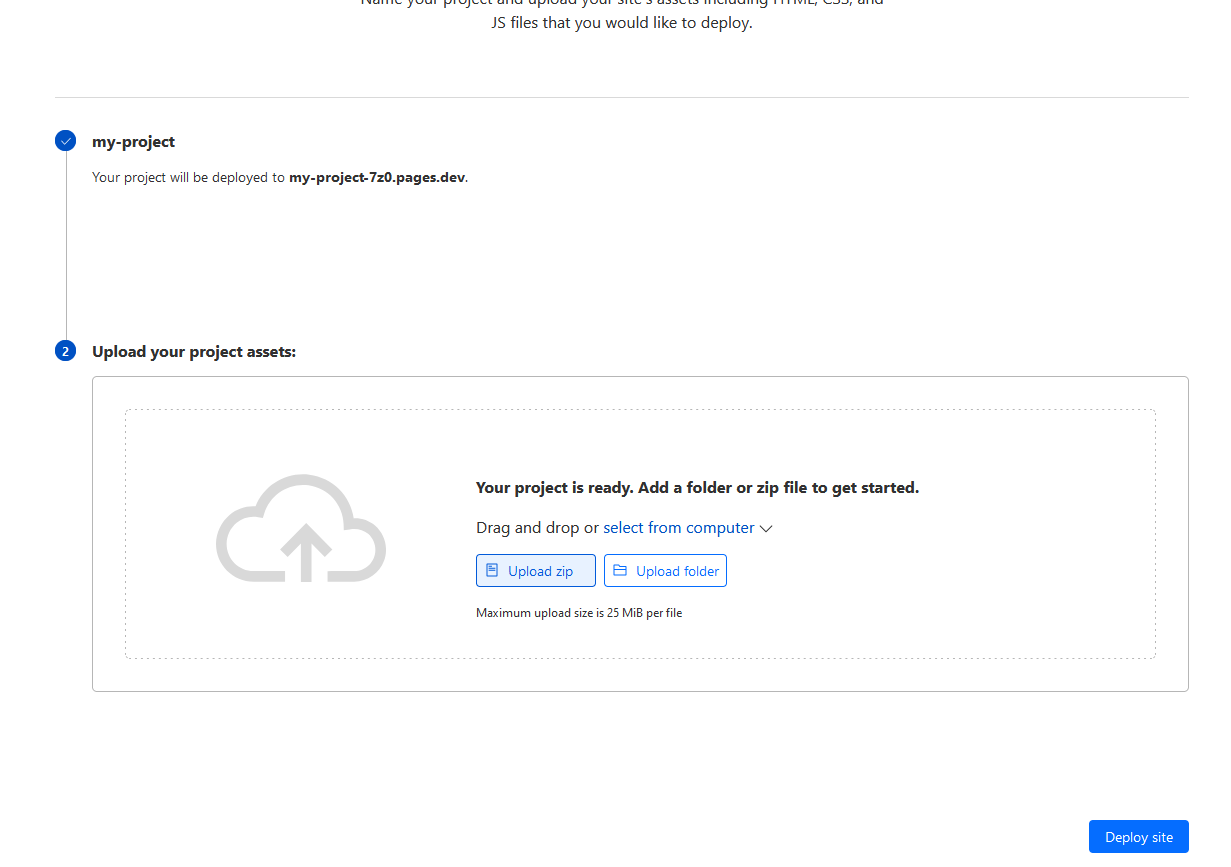
Cool, we got our website now running and can open it using the link we saw (in my case http://my-project.7z0.pages.dev). Now we need to retrieve some credentials in order to deploy our generated website.
Setup of Cloudflare credentials
At first we will generate a new API token:
- Log in to the Cloudflare Dashboard
- Click the Avatar in the top right corner and select “My Profile”
- Select
API Tokens -> Create Token -> Create Custom Token - Give the token a name and select as permission
Account -> Cloudflare Pages -> Edit - Continue and note down your token
Lastly, we need the Account ID which can be found in the dashboard of your website: Websites -> {your website}. Now we are prepared on the CF side of things.
Hugo
I assume you have Hugo installed (available in most package managers such as brew, chocolatey and apt). If you encounter some issues in this section, please consider reading the official documentation of Hugo since this post may be outdated by then.
Create a new project
We at first need to setup a new project, which is quite straight-forward since Hugo does all the boilerplate for us.
hugo new site my-website
Afterwards, we need will setup a new (local) git repository and add a theme as submodule. This theme will then be activated.
cd my-website
git init
git submodule add https://github.com/theNewDynamic/gohugo-theme-ananke.git themes/ananke
echo "theme = 'ananke'" >> hugo.toml
Now we can test, if everything works as expected by opening http://localhost:1313/ . This should open some default content.
Creating content will not be part of this post. Check out the Hugo documentation, if you need help there.
Configure Base URL
We will need to adjust the base URL of our Hugo installation. To do so, edit the base URL in hugo.toml and set it to the one you saw when setting up your Cloudflare Page (in my case https://my-project.7z0.pages.dev).
Add Cloudflare headers
One very important thing is to configure the headers that are being sent by your Cloudflare deployment. By default, you will face an error like the following:
The resource from “https://your-deployment/bundle.js” was blocked due to MIME type mismatch (X-Content-Type-Options: nosniff).
To do so, we add a new file _headers in our root directory with the following content (if you need additional files to be supported, you will need to add them manually).
/*
  Cache-Control: max-age=1209600, s-maxage=1209600, stale-if-error=600
  Cloudflare-CDN-Cache-Control: max-age=1209600, stale-if-error=600
  CDN-Cache-Control: 1209600, stale-if-error=600
  X-Frame-Options: DENY
  X-Content-Type-Options: nosniff
  Access-Control-Allow-Origin: *
  Referrer-Policy: strict-origin-when-cross-origin
  Server: cloudflare
/*.js
  Content-Type: application/x-javascript; charset=utf-8
/*.html
  Content-Type: text/html
/*.png
  Content-Type: image/png
/*.css
  Content-Type: text/css
This assures, that the Content-Type is being set correctly for the respective file types and uses some optimized Caching settings.
Github Setup
Overall setup
We are now done with the overall setup and are ready to deploy it. Since we do not want to upload the content each time manually, we are going to automate it so that the most recent version is always being deployed on our Cloudflare page.
Create a Github repository at first. Then we will add our code, setup the remote repo and commit it.
git add --all
git commit -m "first commit"
git branch -M main
git remote add origin git@github.com:Sapp00/hugo-cloudflare-github.git
git push -u origin main
Now our code should be pushed, what is left is the automation aka Github Workflow.
Github Workflow
Create the directory structure for our workflow.
mkdir -p .github/workflows
Next, we will create the workflow, by adding a new file called pages.yaml.
name: Pages

on:
  workflow_dispatch: # allows manual triggering
  push:
    branches:
      - main

permissions:
  contents: read
  pages: write
  id-token: write

concurrency:
  group: "pages"
  cancel-in-progress: false

defaults:
  run:
    shell: bash

jobs:
  cloudflare-upload:
    runs-on: [ubuntu-latest]
    env:
      HUGO_VERSION: 0.128.0
    permissions:
      contents: read
      deployments: write
    name: Publish to Cloudflare Pages
    steps:
      - name: Install Hugo CLI
        run: |
          wget -O ${{ runner.temp }}/hugo.deb https://github.com/gohugoio/hugo/releases/download/v${HUGO_VERSION}/hugo_extended_${HUGO_VERSION}_linux-amd64.deb \
          && sudo dpkg -i ${{ runner.temp }}/hugo.deb
      - name: Install Dart Sass
        run: sudo snap install dart-sass
      - name: Checkout
        uses: actions/checkout@v4
        with:
          submodules: recursive
          fetch-depth: 0
      - name: Install Node.js dependencies
        run: "[[ -f package-lock.json || -f npm-shrinkwrap.json ]] && npm ci || true"
      - name: Build with Hugo
        env:
          HUGO_CACHEDIR: ${{ runner.temp }}/hugo_cache
          HUGO_ENVIRONMENT: production
          TZ: Europe/Berlin
        run: |
          hugo \
            --gc \
            --minify \
      - name: Add Cloudflare Headers
        run:
            mv _headers ./public/_headers
      - name: Cloudflare Upload
        uses: cloudflare/pages-action@1
        with:
          apiToken: ${{ secrets.CLOUDFLARE_API_TOKEN }}
          accountId: ${{ secrets.CLOUDFLARE_ACCOUNT_ID }}
          projectName: website
          directory: ./public
          gitHubToken: ${{ secrets.GITHUB_TOKEN }}
So, what is happening here? Let’s go through some important points shortly, that are (in my opinion) not self-explaining.
on:
  workflow_dispatch: # allows manual triggering
  push:
    branches:
      - main
We allow that the workflow can be triggered manually (makes debugging way easier) and trigger it automatically each time we push changes to our main branch.
permissions:
  contents: read
  pages: write
  id-token: write
These are the permissions that are necessary in order to deploy our code.
jobs:
  cloudflare-upload:
    runs-on: [ubuntu-latest]
    env:
      HUGO_VERSION: 0.128.0
    permissions:
      contents: read
      deployments: write
    name: Publish to Cloudflare Pages
    steps:
      - name: Install Hugo CLI
        run: |
          wget -O ${{ runner.temp }}/hugo.deb https://github.com/gohugoio/hugo/releases/download/v${HUGO_VERSION}/hugo_extended_${HUGO_VERSION}_linux-amd64.deb \
          && sudo dpkg -i ${{ runner.temp }}/hugo.deb
      - name: Install Dart Sass
        run: sudo snap install dart-sass
      - name: Checkout
        uses: actions/checkout@v4
        with:
          submodules: recursive
          fetch-depth: 0
      - name: Install Node.js dependencies
        run: "[[ -f package-lock.json || -f npm-shrinkwrap.json ]] && npm ci || true"
Here, we setup our jobs, so what is being executed on each push. It should use Ubuntu as OS and define our Hugo version that is being used and the necessary permissions. Then it will install the necessary tooling and checkout the most recent version of our repository. Finally, it will install all the Node.js dependencies we need.
- name: Build with Hugo
  env:
    HUGO_CACHEDIR: ${{ runner.temp }}/hugo_cache
    HUGO_ENVIRONMENT: production
    TZ: Europe/Berlin
  run: |
    hugo \
      --gc \
      --minify
Next, it will build our project and compress the output (which is very recommended for production).
- name: Add Cloudflare Headers
  run:
    mv _headers ./public/_headers
Since the _headers file needs to be in the root directory of our deployment, we are copying it to the directory that is going to be pushed to Cloudflare Pages.
- name: Cloudflare Upload
  uses: cloudflare/pages-action@1
  with:
    apiToken: ${{ secrets.CLOUDFLARE_API_TOKEN }}
    accountId: ${{ secrets.CLOUDFLARE_ACCOUNT_ID }}
    projectName: my-project
    directory: ./public
    gitHubToken: ${{ secrets.GITHUB_TOKEN }}
Finally, our built website needs to be pushed to Cloudflare. To do so, we need to define our projectName, the name of our Cloudflare Page we created earlier. Additionally, it is necessary to provide the apiToken and the accountID. Since these are sensitive information, we don’t want to include it as plaintext, but store it as a Github secret.
Github Secrets
In your Github repository go to Settings -> Secrets and Variables -> Actions. We will need to add two repository secrets:
CLOUDFLARE_API_TOKEN = {your API token}
CLOUDFLARE_ACCOUNT_ID = {your account ID}
We are done with our setup and just need to push our changes.
git add --all
git commit -m "added workflow"
git push origin main
Now, the workflow will be triggered and the code deployed on Cloudflare Pages. You should be able to open your Hugo project using the link created earlier.
The full source code can be found on my Github.